Welcome to your guide on “How to Track Button Clicks in Google Analytics 4”!⚡ In this riveting read, we’ll delve into the nuances of tracking button clicks with the latest iteration of Google Analytics. Armed with this knowledge, you’ll be able to:
- First, uncover patterns in user behavior on your website.
- Next, understand which buttons garner the most interaction.
- Finally, use this data to fine-tune your digital strategy and drive conversions.
Picture this: your homepage has a vibrant “Subscribe” button, but subscriptions aren’t spiking as you’d hoped. With Google Analytics 4, you can track the clicks on this button and couple this with Plerdy’s UX & SEO analysis to better understand your user journey.
Whether you’re a seasoned digital marketer or just starting, this guide will empower you to transform button clicks into valuable insights. So let’s dive into the art of click tracking with Google Analytics 4 and pave the way for a data-driven future!
What Is Click Tracking?
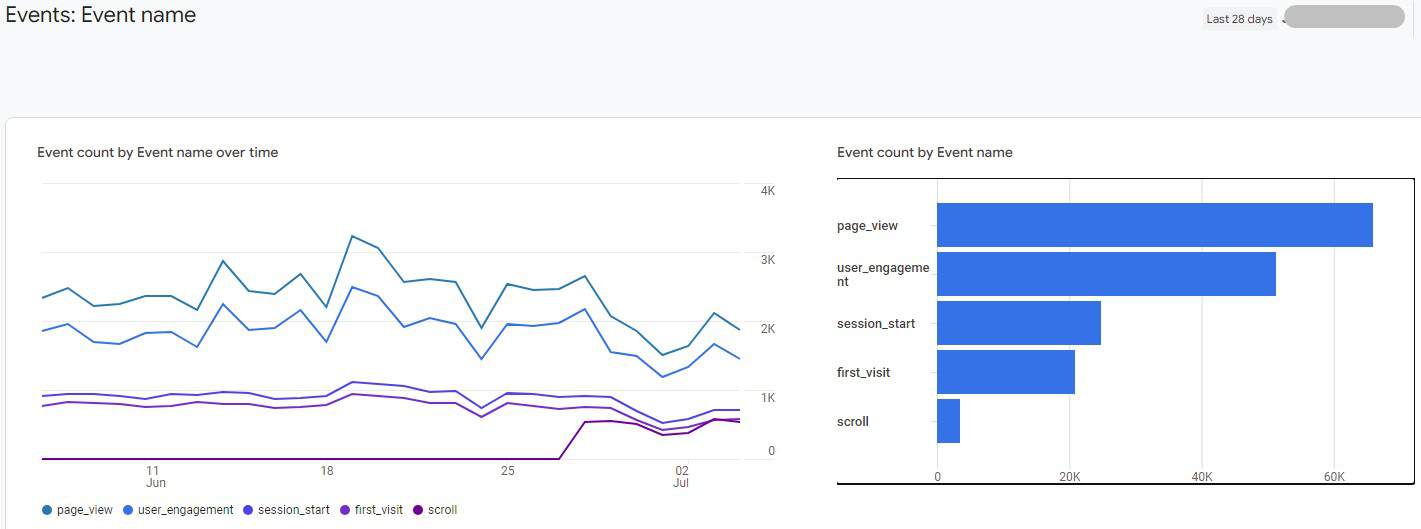
Click tracking – the unsung hero of the digital marketing arena. It’s a dynamic tool that helps you monitor user interactions on your website, specifically their clicks.
- Understand which buttons or elements drive the most engagement.
- Identify events that lead to conversions and those that don’t.
- Seamlessly integrate your click tracking with Google Analytics for more comprehensive data analysis.
For a concrete example, imagine an online store. Click tracking could reveal customers are drawn to a particular product’s button but don’t proceed to the checkout page. This valuable insight could prompt you to reassess the product’s pricing or description, nudging your audience toward conversion.
Click tracking is your secret weapon in the digital landscape. It equips you with the insights you need to streamline your website and propel your business to the top. So harness its power and watch your digital strategy thrive.
The Role of Button Click Tracking in Google Analytics
Google Analytics 4 (GA4) has fundamentally transformed how we track user interactions online, and button click tracking serves as a cornerstone. By monitoring each click, you gain profound insights into your user’s journey – each button click tells a unique story about user behavior, showcasing user interests, needs, and preferences.
Here’s an illustration of how button click tracking can play out in a real-world scenario:
- A potential customer lands on your e-commerce site.
- First, they click on a product category button, indicating an interest.
- Next, they click on a specific product button for more details.
- Finally, they click the ‘Add to Cart’ button, signaling an intent to purchase.
Every button clicks in this journey provides valuable data, like breadcrumbs leading to a desired outcome. By harnessing this data through GA4, businesses can optimize their user experience, streamline the sales funnel, and boost conversion rates.
Button click tracking in GA4 equips you with a powerful tool, enabling you to dive deep into user behavior. From discovering which buttons are garnering attention to identifying those that aren’t, this vital feature of Google Analytics propels your data-driven strategy, helping you create an intuitive, engaging website tailored to your audience’s needs.
Benefits of Monitoring User Interactions
When leveraging the power of Google Analytics 4 (GA4), monitoring user interactions through button click tracking is an invaluable strategy. The numerous benefits catapult your ability to understand user behavior, optimize engagement, and improve website performance.
Imagine you run an online clothing store. You track the ‘Add to Cart’ button clicks and observe a trend – customers browse multiple items but often abandon the cart before completing the purchase. This data reveals a potential bottleneck in your sales funnel that requires immediate attention.
Here are some ways this powerful feature can give you an edge:
- Identifying popular buttons can provide insight into user preferences, helping tailor offerings accordingly.
- Pinpointing underperforming buttons helps rectify potential UX/UI issues, improving overall site navigation.
- By understanding user pathways, you can streamline the user journey, nudging them toward conversion.
- Time on a page can be significantly increased by optimizing button placement and design based on click data.
In essence, monitoring button clicks with GA4 illuminate user preferences and behaviors in a detailed, actionable manner. It paves the way for an in-depth understanding of what captivates your audience and encourages interaction. Consequently, GA4’s button click tracking equips you to craft a seamless, engaging, and productive user experience, fueling your growth strategy in a data-driven digital ecosystem.
Plerdy Event Tracking
Dive into the power of Plerdy Event Tracking – a remarkable tool that allows you to monitor and analyze user interaction on your website. Streamline your digital strategy by understanding the nuances of every click and button interaction.
- Plerdy’s tool seamlessly integrates with Google Analytics, supercharging your data collection process.
- Track user behavior in real-time – get insights on what interests your audience, down to the specific buttons they interact with.
- Use this rich data to refine your website design, enhancing user experience.
For instance, consider a scenario where users frequently click a call-to-action button, but the conversion rate remains low. With Plerdy Event Tracking, you can delve into the why – perhaps they’re led to a less-than-stellar landing page. From here, strategize improvements to boost conversions.
In a digital era driven by data, Plerdy Event Tracking is the trusted companion you need – always reliable, always insightful.
Setting Up Google Analytics 4
Overview of Google Analytics 4
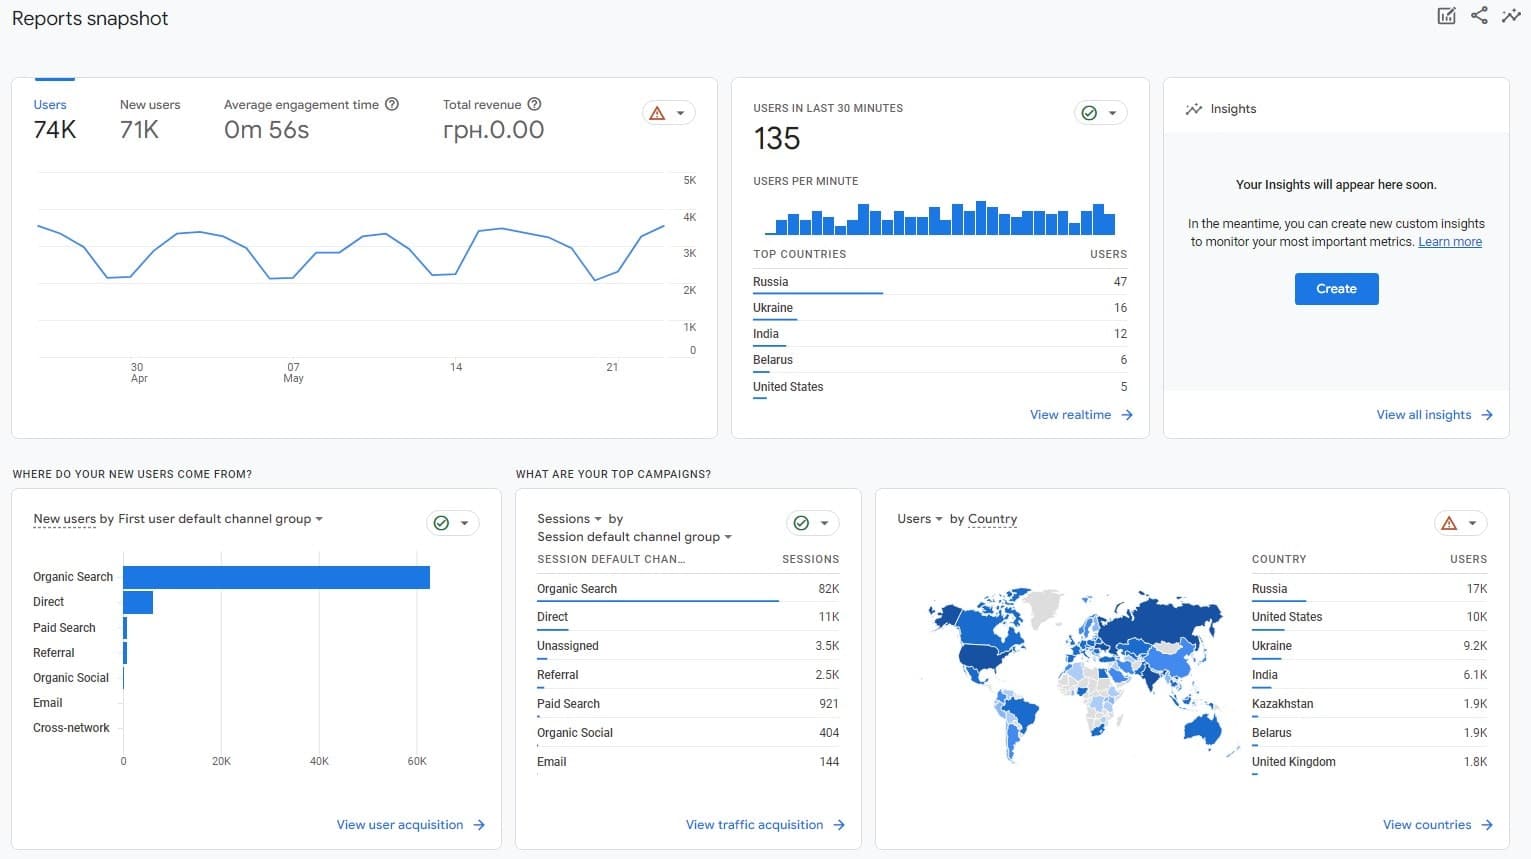
Google Analytics 4 (GA4), the latest version of Google’s web analytics platform, has reshaped the digital analytics landscape. It’s been meticulously designed to track and analyze user interactions, empowering businesses to create optimal digital experiences. GA4 is your one-stop solution for comprehensive user behavior analysis, from button click tracking to user journey mapping.
Consider a digital marketing agency trying to understand their clients’ user behavior. With GA4, they can access a plethora of features to gather robust data. Here’s a glimpse into what GA4 offers:
- Advanced tracking: GA4 can track many user interactions, including button clicks, form submissions, and more, providing in-depth insights.
- Cross-platform insights: It enables tracking user behavior across multiple devices and platforms – a boon in today’s multi-device digital environment.
- AI-powered insights: Utilize the power of machine learning to predict future trends and behaviors, helping you stay a step ahead of your competition.
- Enhanced privacy features: GA4 respects user data privacy, helping businesses comply with current data protection regulations without compromising on data insights.
GA4 elevates the way you track and interpret user behavior. It moves beyond basic metrics and delves deeper into the story of your users. The button click tracking is a foundation for an all-encompassing, data-driven approach to boost user engagement and conversions. With GA4, businesses can make informed strategic decisions, truly harnessing the power of data.
Steps to Set Up Google Analytics 4 for Your Website
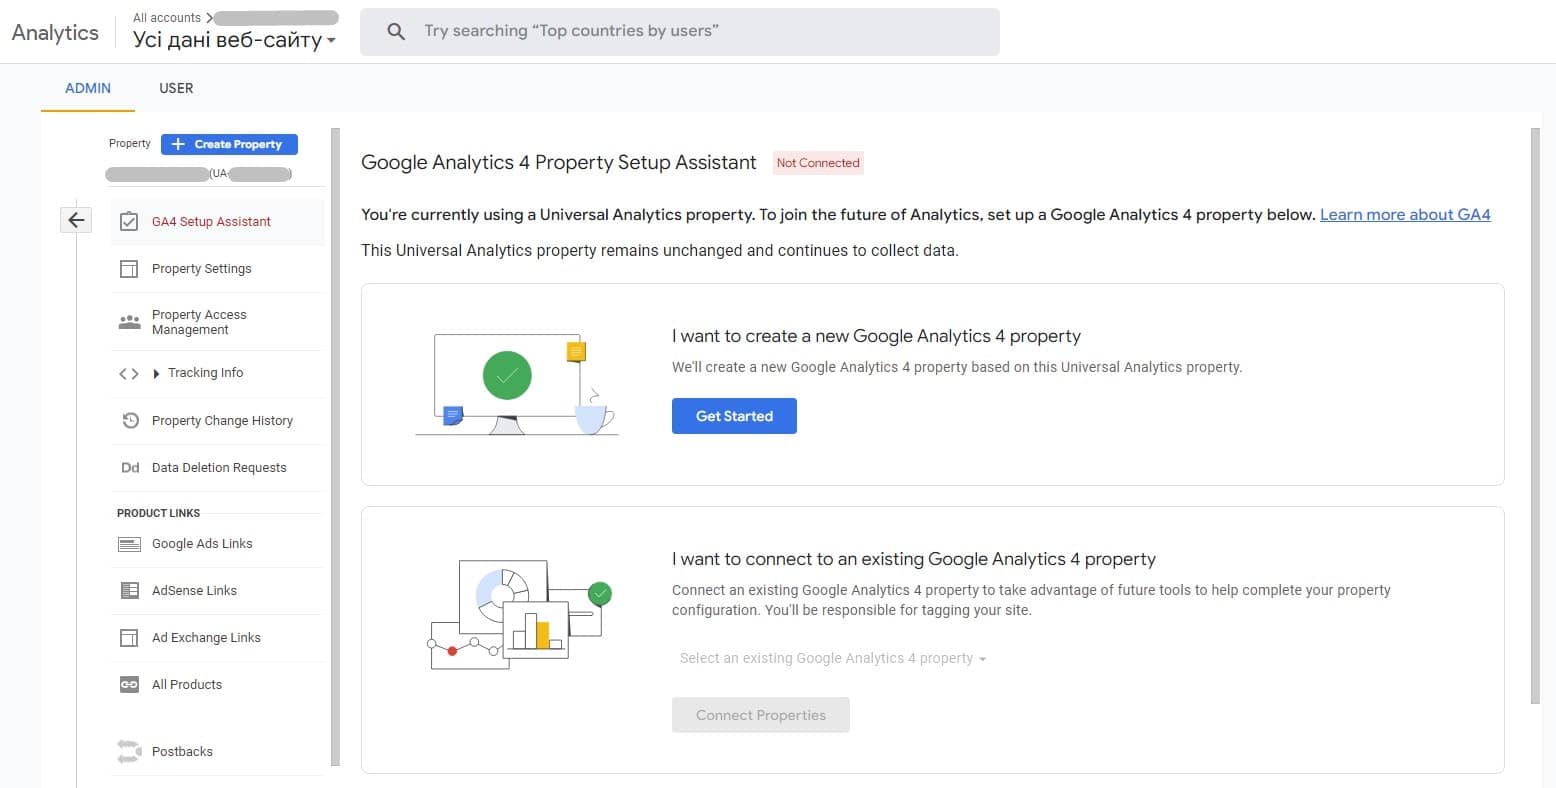
Integrating Google Analytics 4 (GA4) into your website sets the stage for superior data tracking, facilitating a more nuanced understanding of user behavior. Whether tracking button clicks or mapping user journeys, GA4 is your trusted ally.
Consider a digital bookstore wanting to enhance user experience. By integrating GA4, they can track and analyze button clicks, understanding which books catch their readers’ attention the most. But first, let’s delve into the process of setting up GA4:
- First off, sign in to your existing Google Analytics account or create a new one using your Google credentials.
- Navigate to the ‘Admin’ option, located at the bottom-left of the dashboard, then click ‘+Create Property.’
- Fill in the relevant details like website name, URL, industry category, and the appropriate time zone.
- Once done, you’ll receive a unique GA4 Measurement ID, crucial for data tracking.
- This code must be inserted into the ‘header’ section of your website’s code. This process varies based on your website platform but generally involves pasting the ID into a designated ‘header’ field in your website settings.
As soon as these steps are accomplished, GA4 begins its magic – monitoring user interactions, including button clicks, and compiling valuable data. As a result, you’re effectively spotlighting your users’ behavior, enabling you to shape a user experience that truly resonates and amplifies your digital success.
Getting Familiar with Google Tag Manager
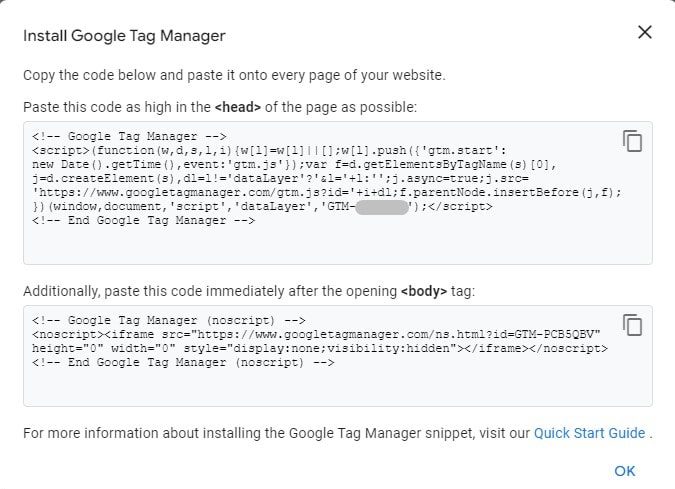
Integrating Google Tag Manager with Google Analytics 4
In digital analytics, integrating Google Tag Manager (GTM) with Google Analytics 4 (GA4) is a powerful move that aligns your website’s tracking mechanisms for maximum data accuracy. With minimal manual intervention, this combination effectively tracks button clicks, user engagement, and more.
For instance, a travel blog site can use this integration to monitor which ‘Book Now’ buttons get the most clicks, offering them valuable insights into popular destinations. Here’s a step-by-step guide on how to achieve this integration:
- Firstly, ensure you have a GA4 property in your Google Analytics account.
- Then, in GTM, create a new tag and choose GA4 Configuration.
- Next, enter your GA4 Measurement ID (found in the GA4 property) in the corresponding field.
- Next, configure the triggering events to your preference, activating the tag.
- Finally, click ‘Save’ and ‘Submit’ your changes to finalize the setup.
Once integrated, GTM and GA4 work hand-in-hand to collect, process, and present data from your website, allowing you to refine your marketing strategies based on actionable insights. This synthesis of data-management tools offers a new level of understanding about your users’ journey – paving the way for your website to resonate better with its audience.
Configuring Google Analytics 4 for Button Click Tracking
Creating a New Tag for Button Clicks
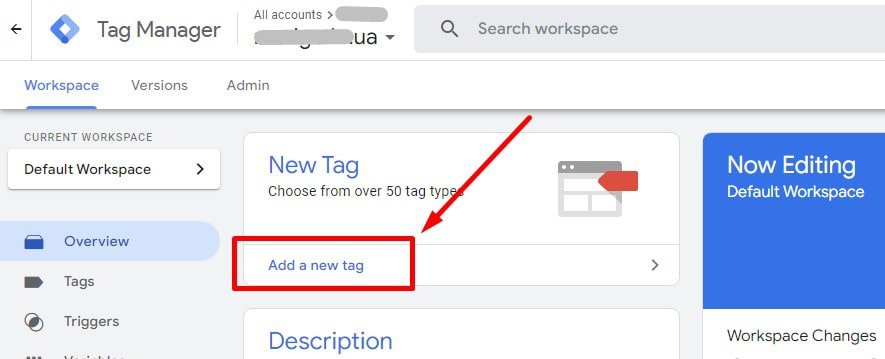
In the digital landscape, tracking user interactions, especially button clicks, through Google Analytics is instrumental in understanding your audience’s behavior. Creating a new tag in Google Tag Manager is a straightforward and effective method to achieve this.
Consider an e-commerce website with various ‘Add to Cart’ buttons. Here’s how you’d create a new tag to track these clicks:
- Kick-off by launching Google Tag Manager and navigating to your desired container.
- Hit ‘New Tag,’ then fill in the tag name – perhaps, ‘GA – Add to Cart Button Click.’
- For the tag type, opt for ‘Google Analytics: Universal Analytics,’ for Track Type, select ‘Event.’
- In the ‘Category’ field, you might type ‘Button Click’ and ‘Add to Cart’ for ‘Action.’
- Set up the triggers to detect button clicks – you can specify it to ‘Click – All Elements’ and select ‘Some Clicks,’ defining the conditions to match your ‘Add to Cart’ button.
- Complete the process by saving and publishing your new tag.
With this newly minted tag, every click on the ‘Add to Cart’ button will be tracked, providing granular insights that can significantly streamline your sales funnel, better resonating with your customer’s journey and preferences.
Setting Up Trigger for the Tag
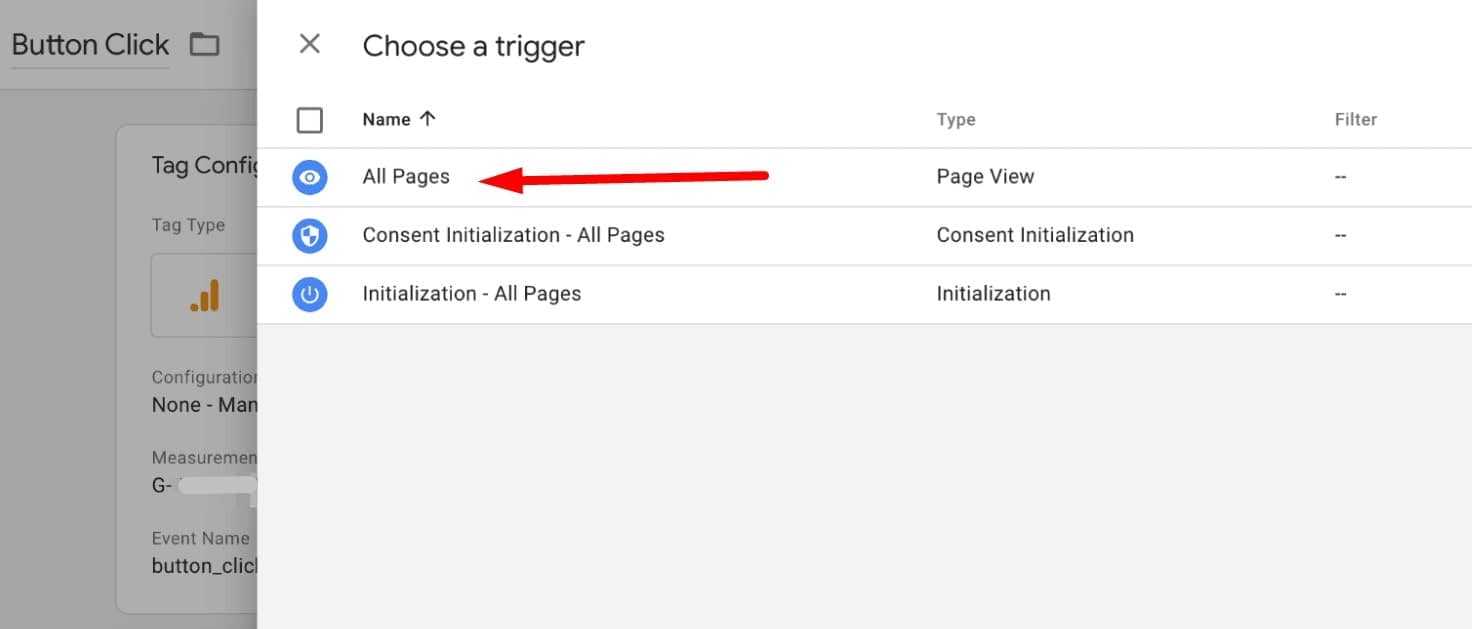
Perfecting the tracking of user interactions on your site involves setting up a precise trigger for your tag in Google Tag Manager. This trigger instructs your tag to act when a specific interaction occurs, such as a button click.
Picture this: you run an online book store and want to track clicks on a button that opens a preview of your bestseller. Here’s your pathway to setting up the trigger:
- Begin in the Google Tag Manager interface, then steer towards ‘Triggers’ and click ‘New.’
- Label the trigger, perhaps ‘Preview Button Click,’ and opt for ‘Click – All Elements’ in the Trigger Configuration.
- Next, choose ‘Some Clicks’ and specify the conditions to match the preview button – the clicked element might be ‘preview-button.’
- Finally, click ‘Save’ to lock in your new trigger.
With these steps:
- Start Google Tag Manager and click ‘Triggers’ > ‘New.’
- Name your trigger and select ‘Click – All Elements.’
- Choose ‘Some Clicks’ and set conditions to match your button.
- Hit ‘Save.’
Now, the tag fires whenever a user clicks the preview button, and Google Analytics records the interaction. This valuable insight can help you understand your audience better, letting you shape your content and marketing strategies to engage your readership truly.
Verifying the Tag Configuration
Verifying the tag configuration is crucial following the creation and setting of your new tag in Google Tag Manager. Confirming the tag fires as intended when a button click occurs ensures that every interaction contributes to your analytics data.
Imagine, for instance, that your online boutique has just launched a new seasonal sale, and you’ve set up a tag to track clicks on the ‘View Sale’ button. How can you make sure this tag works as expected?
- Kick-off by opening your website in a new tab, then hit ‘Preview’ in the Google Tag Manager interface.
- Once the tag manager’s debugging pane pops up at the bottom of your site, click the ‘View Sale’ button.
- Your click event should now appear in the debugging pane’s ‘Summary’ panel.
- Click on the event to unfold the details and look for the name of your tag.
- If the tag shows under ‘Tags Fired On This Event,’ you’re all set!
Let’s recap:
- Launch your website and click ‘Preview’ in Google Tag Manager.
- Next, click the tracked button and observe the ‘Summary’ panel in the debug pane.
- Uncover the event details and find your tag.
- Check your tag under ‘Tags Fired On This Event.’
Verifying your tag configuration confirms your Google Analytics data is accurate, comprehensive, and ready to steer your strategy in the right direction.
Testing Button Click Tracking in Google Analytics 4
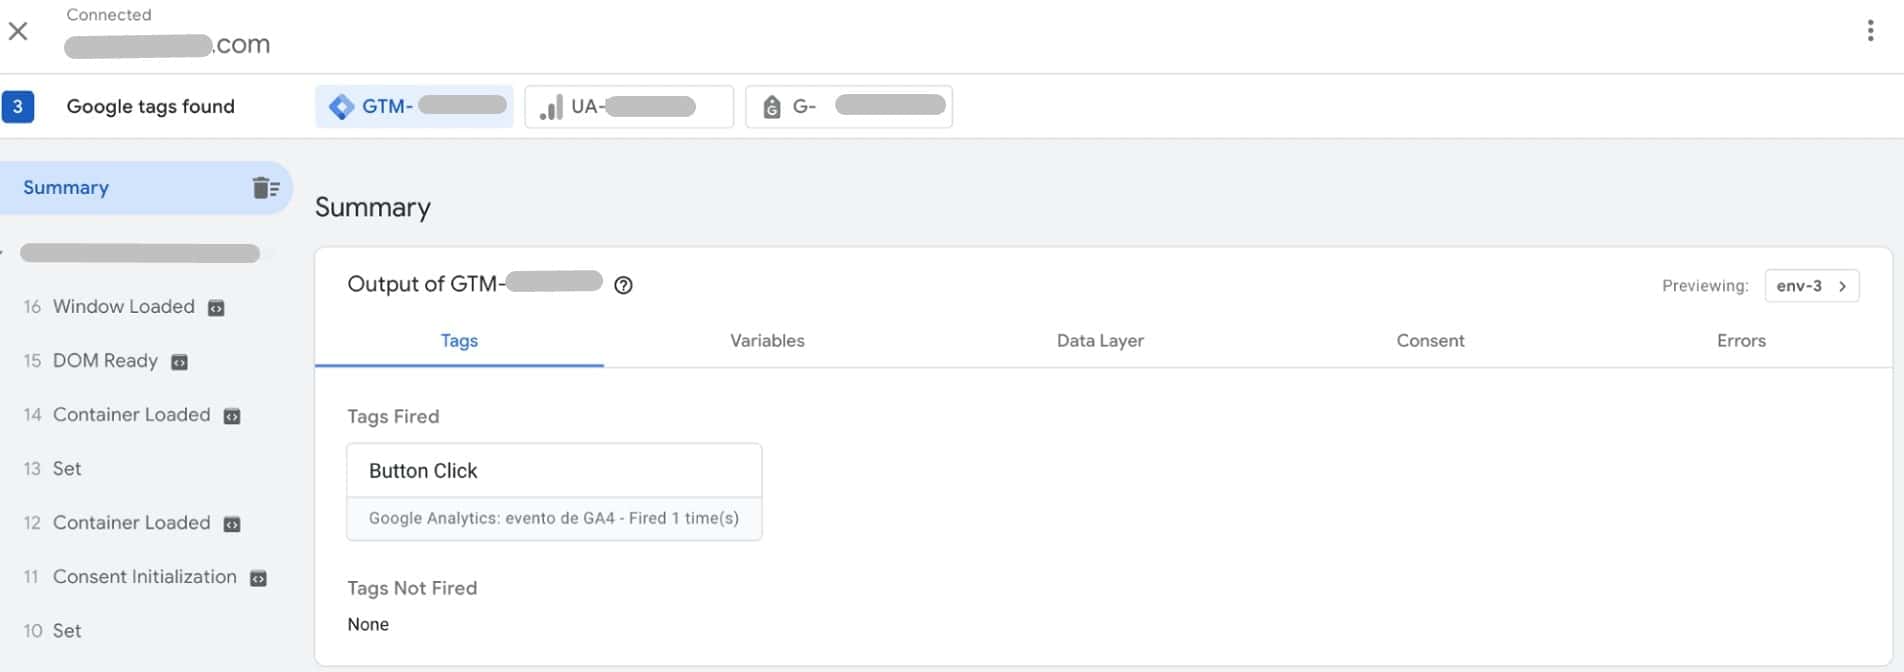
Using Google Tag Manager’s Preview Mode
Google Tag Manager’s Preview Mode comes into play to perfectly streamline your tracking system and ensure that every button click is correctly logged. It serves as a functional microscope, letting you peek into the heart of your tag operations.
Consider you’re running an online bookstore and want to track the ‘Add to Cart’ button. The Preview Mode is your go-to tool.
- First, initiate the ‘Preview Mode’ from your Google Tag Manager dashboard.
- Subsequently, visit your website, where you’ll find a debugging window at the bottom page.
- Click the ‘Add to Cart’ button and observe the events in the ‘Summary’ section.
- Under ‘Tags Fired On This Event,’ you should see your newly created tag.
Here’s a quick rundown:
- First, activate ‘Preview Mode’ in Google Tag Manager.
- Next, head to your website to view the debugging panel.
- Next, click the ‘Add to Cart’ button to complete the desired action.
- Finally, verify the firing of your tag under ‘Tags Fired On This Event.’
Deploying Google Tag Manager’s Preview Mode ensures your tags are firing correctly and gives you a deeper understanding of how users engage with your site. The result? An optimized, fine-tuned, and more insightful Google Analytics setup that directly contributes to your business goals.
Troubleshooting Common Issues in Tag Configuration
Setting up tags in Google Tag Manager to track button clicks and other actions on your website might run into a couple of bumps. Here’s a quick guide to tackling the most common issues you might face.
Let’s say, and for instance, you’re trying to track every time a visitor clicks the ‘Subscribe’ button on your blog. You’ve set up the tag and trigger, but your Google Analytics isn’t showing any data.
- Start by double-checking your trigger configuration. Ensure the specific conditions align with the action you want to track.
- Second, use Google Tag Manager’s Preview Mode to verify if your tag is firing correctly upon clicking the button.
- Lastly, check if you’ve correctly linked your Google Tag Manager and Google Analytics.
- Cross-examine your trigger setup.
- Verify your tag’s firing with the Preview Mode.
- Re-check your Google Tag Manager-Google Analytics link.
By following this guide, you’ll be well-equipped to overcome the common snags you may encounter during tag configuration. Remember, when it comes to tracking and analytics, accuracy is everything. Ensuring your tags and triggers are set up correctly will offer you a wealth of insights about your website and user engagement.
Analyzing Button Click Data in Google Analytics 4
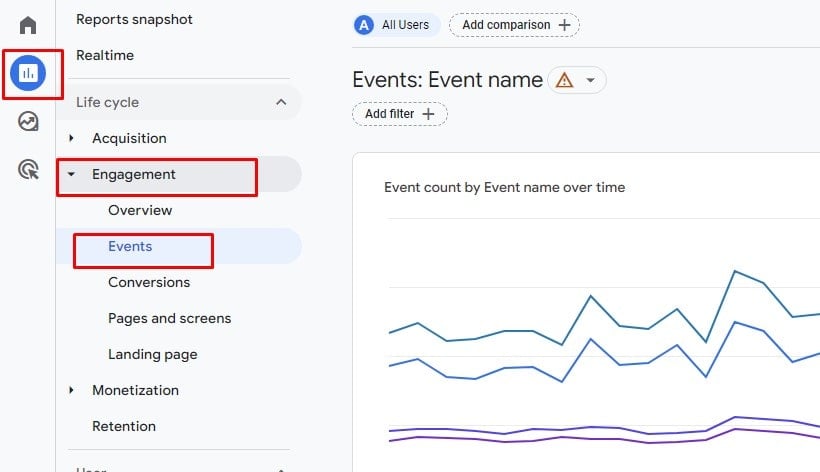
Accessing and Understanding Button Click Reports
The power of tracking button clicks on your website using Google Tag Manager becomes apparent when you dig into the reports in Google Analytics. Understanding these click reports will be vital in boosting your user engagement.
Imagine you’ve set up a tag to track your online store’s “Add to Cart” button. Now you want to know how often that button gets clicked.
Accessing these reports is a breeze – just head to your Google Analytics dashboard. Navigate to Behavior, then Events, and finally Top Events. There, you should see your button click events displayed.
But how to make sense of this information? Here’s a quick breakdown of the data:
- Event Category: This describes the object interacted with – in this case, the “Add to Cart” button.
- Event Action: This defines the type of interaction – i.e., ‘click.’
- Event Label: This usually provides additional information about the action.
Using this guide:
- Access the Top Events section in your Google Analytics.
- Then, understand your report’s Event Category, Action, and Label.
This way, you’ll see who’s engaging with your site and how. That’s the actionable insight you can use to refine your site and skyrocket your conversions. Harness the power of Google Analytics and Google Tag Manager – turn every button click into a potential treasure trove of data.
Interpreting Data for Improved User Engagement
Button click data collected via Google Tag Manager – when funneled into Google Analytics – provides a wealth of insight into user engagement. But, to unlock its potential, you must know how to interpret this data for meaningful actions.
Imagine your e-commerce store has an “Explore More” button, which you’re tracking. Over a month, it receives 5000 clicks. You need to dig deeper.
Page views: Suppose the page hosting the “Explore More” button has 10,000 views. Now, those 5000 clicks present a 50% click-through rate. So it’s an important metric showing the button’s effectiveness.
User demographics: Knowing who’s clicking can help tailor your content. If 60% of clicks are from users aged 18-24, focus on the interests of this age group.
Device type: Are users more likely to click on mobile or desktop? You may need a more mobile-friendly design.
Time on page: Users who spend longer on your page might be likelier to click the button. Time to work on your content to keep them engaged.
By interpreting the data like this:
- Calculate the click-through rate.
- Understand your audience demographics.
- Find out the preferred device type.
- Finally, evaluate the time spent on your page.
You will unravel the patterns behind the clicks, enabling you to create a site that caters to your user’s needs, thus leading to improved engagement and, eventually, conversions.
Optimizing Button Click Tracking for Better Results
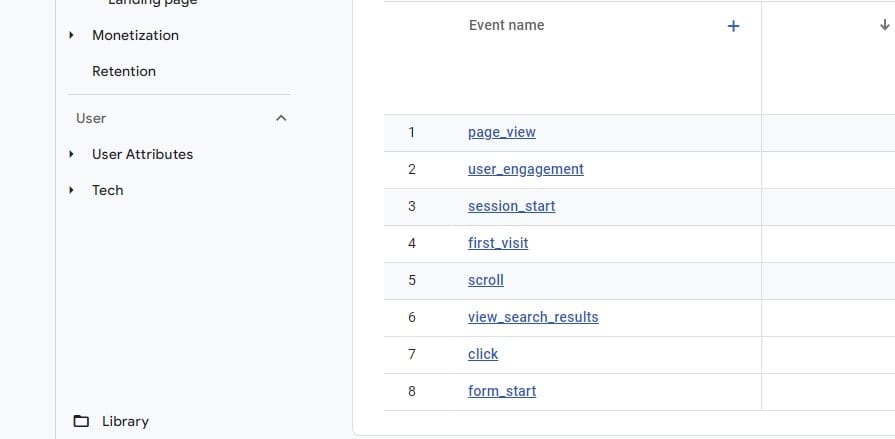
Strategies for Advanced Tracking
Advanced tracking strategies are the key to unlocking deeper insights in a digital landscape enriched with user data. For example, harnessing Google Analytics and GTM can better understand button click behavior.
One prime strategy is event tracking. Beyond tracking clicks, categorize different button actions – such as form submissions, downloads, or video plays. This allows you to analyze how users interact with specific elements on your website.
Consider a digital magazine. They could set up event tracking for their “Download Issue” button, giving them a better understanding of what content motivates their audience to engage more.
Scroll tracking offers another layer of insight. This allows you to see how far down users scroll on your page. If the majority only scroll halfway, perhaps your “Subscribe Now” button would be better placed there than at the bottom.
To fully harness advanced tracking:
- Implement event tracking to analyze specific user actions.
- Use scroll tracking to optimize button placement.
- Utilize heatmaps to visualize user engagement.
Mastering these strategies will provide you with rich, nuanced data. You’ll be able to see not just that a user clicked but why they clicked and what that means for your website. This data-driven approach will allow you to tailor your content and improve user experience.
Best Practices in Button Click Tracking
Button click tracking opens a realm of data, revealing how users interact with your website. These analytics can influence crucial decisions – from content to user interface design. To make the most of this powerful tool, consider some best practices.
Firstly, name your tracked buttons. Consistent, meaningful button names make your reports more digestible, eliminating confusion. Imagine tracking the “Buy Now” button on an e-commerce site – clear names can highlight which products spur the most customer engagement.
You can see button click behavior for specific user groups by segmenting your audience in Google Analytics. For example, maybe mobile users are more likely to click on your “Subscribe” button than desktop users.
The final cornerstone is regular data analysis. Button click tracking is not a set-it-and-forget-it tool. Instead, regularly reviewing and acting upon your data will allow you to stay responsive to changing user behavior.
To sum it up:
- Name your buttons clearly and consistently for easy analysis.
- Segment your audience to understand different user behaviors.
- Finally, regularly review your data to stay responsive.
Adhering to these practices can turn button click tracking from a simple data collection tool into a dynamic instrument, refining your website and boosting user engagement. So dive into your data and start exploring – you’ll be surprised at what you can find!
Bottom Line
In conclusion, mastering the art of tracking button clicks in Google Analytics 4 can dramatically elevate your digital marketing strategy. By tracing your visitors’ journey with precision – every click, every event –, you glean valuable insights to craft a better user experience.
Here’s what you’ve learned:
- Tracking button clicks is not just about counting interactions; it’s about understanding the user’s path on your website.
- Google Analytics 4 provides the tools to capture this data, but it requires technical mastery to set parameters and variables correctly.
- While you can serve this purpose in-house, using automated solutions like Plerdy’s suite of tools can save you hours of manual labor and potential errors.
It’s time to take your website analytics to the next level. If you’re ready to learn more, explore Plerdy’s resources. Their e-books, blog posts, and tutorials are a treasure trove of knowledge. Try Plerdy’s free trial and experience the power of its tools firsthand. Understanding your visitors’ wants is the key to a successful online business.⚡
